Building a GraphQL Service to Expose Data in a SQL Database
Videos
| GraphQL | Building a Service |
In this video we show how you can build a
GraphQL API to expose data in a SQL database. Watch Video |
| GraphQL | Testing your Service |
Once you have defined a GraphQL API you can use the built-in
tester to test your GraphQL API. Watch Video |
| GraphQL | Testing your Service - Using Variables |
You can use variables in your query parameters rather than
using hard coded literal values. Watch Video |
| GraphQL | Testing your Service - Getting Multiple Records |
You can use a GetMany query to return multiple records.
When you return multiple records, you can specify a page
size, number of records to skip over etc. Watch Video |
| GraphQL | Paginated Queries |
When you use a GetMany query, you can do paginated
queries. Watch Video |
| GraphQL | Update Mutations |
Using an Update mutation you can perform Updates on any of the tables
exposed in the API. Watch Video |
| GraphQL | Add Mutations |
Using an Add mutation you can add records to a table. Watch Video |
| GraphQL | Delete Mutations |
Using a Delete mutation you can delete records to a
table. Watch Video |
| GraphQL | Executing a GraphQL Query Directly from the Browser |
When you execute a GraphQL query, you can either do the
query in server-side code or client-side code. In this video we show how you can make a request to a GraphQL endpoint directly from the browser and then populate a List control with the data returned by the query. Watch Video |
Creating a GraphQL API
GraphQL has become a very popular approach for defining APIs. Unlike REST APIs, which have multiple endpoints, a GraphQL API exposes a single endpoint that allows many different types of queries and mutations (a mutation is a method that changes data). Alpha Anywhere has a built-in genie that makes creating a GraphQL service (i.e. API) to expose data in a SQL database extremely easy.
Enabling the GraphQL Service Builder
GraphQL is not yet released as an official part of Alpha Anywhere. You can get access to the GraphQL features by entering the following feature key: FPb76c8988ab834b.
From the Web Control Panel, select the Tools, Feature Packs command and then enter the feature key.
How to Create a GraphQL API
Alpha Anywhere has a built-in genie that automatically generates a GraphQL API that can be used to query a SQL database, perform CRUD operations against tables in a SQL database, execute custom mutations (i.e. call custom function defined in Xbasic classes or Node APIs that you write).
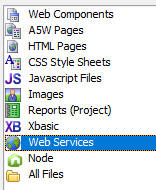
To create a GraphQL API select the Web Services category in the Web Control Panel.
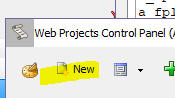
Then click the New button.
This will display the New Service Type dialog.
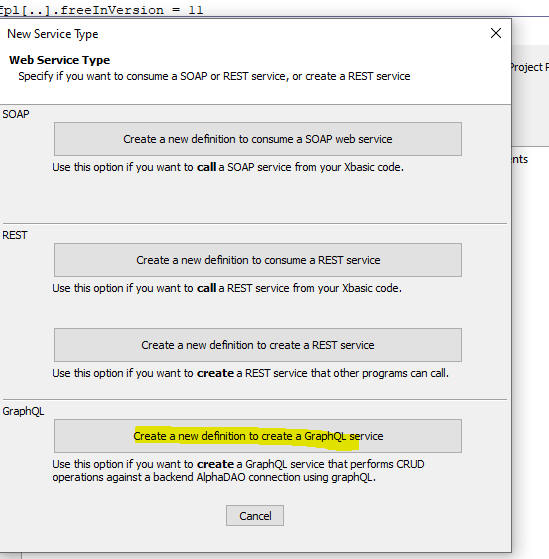
Click the Create a new definition to create a GraphQL service button. This will open the builder.

The GraphQL service builder assumes you will be creating a service to expose data in a SQL database. Therefore, you must specify the connection string to your SQL database. You will then be able to select which tables in your SQL database you want to expose in your service.
Click the Change Connection String.. hyperlink and select a connection string.
Next, click the Pick Tables... hyperlink. The Select Tables to Expose dialog will be shown.
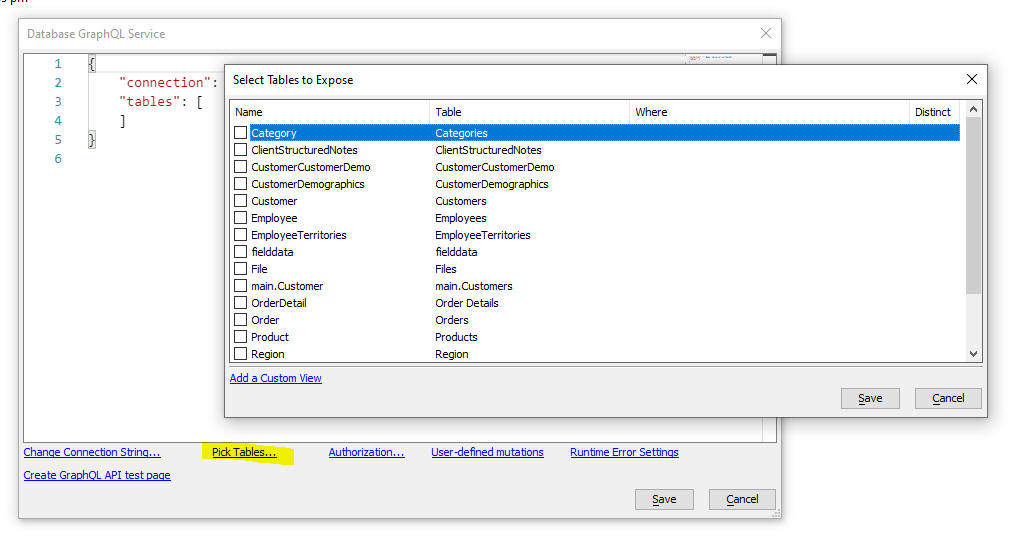
Pick the tables that you want your service to expose. The genie will automatically detect relationships between tables. For example, if you select a connection string for the sample Northwind database, the builder will automatically infer that there is a one-to-many relationship between the Customers and Orders tables, between the Orders and Orders Details table and so on. The builder will also be able to automatically infer that that there is a one-to-one relationship between the Order Details and the Products table, etc.
Custom Views
In addition to exposing the physical tables in your database you can also expose views (virtual tables) by clicking the Add a Custom View hyperlink. A custom view lets you define which columns to expose and what WHERE clause to apply. You can also specify if you want DISTINCT records. (When executing a GraphQL query against a Custom View, the user will be able to apply additional filter parameters - in addition to the WHERE clause defined for the Custom View.)
NOTE Another way in which to limit the columns you expose from a particular table is to modify the schema that Alpha Anywhere generates after you click the Save button to close the Database GraphQL Service window.
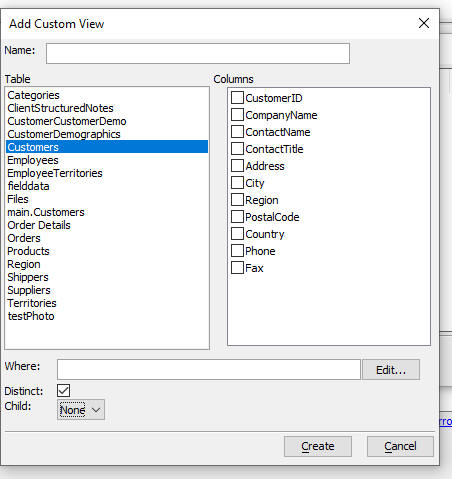
Click the Create button button to define the Custom View and return to the Database GraphQL Service window.
Once you are back at the Database GraphQL Service window, click the Save button when you are done and give your service a name. Alpha Anywhere will then automatically generate a schema for your service.
A sample of the Schema is shown below (in abbreviated form to save space):
Notice that for each table you selected, the schema specifies which type of CRUD operations are allowed, and it specifies which fields from the table are exposed. In addition, each table may have a children property which specifies the one-to-many tables that are linked to the table and a join property which specifies the one-to-one tables that are linked to the table.
			{
    "connection": "::Name::sqlserver_northwind",
    "tables": [
        {
            "name": "Customers",
            "actualname": "Customers",
            "query": true,
            "insert": true,
            "update": true,
            "delete": true,
            "first": true,
            "cursor": true,
            "skip": true,
            "totalCount": true,
            "orderBy": true,
            "fields": [
                {
                    "name": "CustomerID",
                    "type": "String"
                },
                {
                    "name": "CompanyName",
                    "type": "String"
                },
                {
                    "name": "ContactName",
                    "type": "String"
                },
                more fields.....,
                {
                    "name": "cursor",
                    "expression": "CustomerID",
                    "type": "String"
                }
            ],
            "children": [
                {
                    "name": "Orders",
                    "parent": "CustomerID",
                    "child": "CustomerID"
                }
            ]
        },
        {
            "name": "Employees",
            "actualname": "Employees",
            "query": true,
            "insert": true,
            "update": true,
            "delete": true,
            "first": true,
            "cursor": true,
            "skip": true,
            "totalCount": true,
            "orderBy": true,
            "fields": [
                {
                    "name": "EmployeeID",
                    "type": "Double"
                },
                {
                    "name": "LastName",
                    "type": "String"
                },
                {
                    "name": "FirstName",
                    "type": "String"
                },
more fields....
                {
                    "name": "cursor",
                    "expression": "EmployeeID",
                    "type": "String"
                }
            ],
            "children": [
                {
                    "name": "Employees",
                    "parent": "EmployeeID",
                    "child": "ReportsTo"
                },
                {
                    "name": "Orders",
                    "parent": "EmployeeID",
                    "child": "EmployeeID"
                }
            ]
        },
        {
            "name": "OrderDetails",
            "actualname": "Order Details",
            "query": true,
            "insert": true,
            "update": true,
            "delete": true,
            "first": true,
            "cursor": true,
            "skip": true,
            "totalCount": true,
            "orderBy": true,
            "fields": [
                {
                    "name": "OrderID",
                    "type": "Double"
                },
                {
                    "name": "ProductID",
                    "type": "Double"
                },
                more fields...
                {
                    "name": "cursor",
                    "expression": "OrderID+ProductID",
                    "type": "Double"
                }
            ],
            "join": [
                {
                    "name": "Orders",
                    "parent": "OrderID",
                    "child": "OrderID"
                },
                {
                    "name": "Products",
                    "parent": "ProductID",
                    "child": "ProductID"
                }
            ]
        },
        {
            "name": "Orders",
            "actualname": "Orders",
            "query": true,
            "insert": true,
            "update": true,
            "delete": true,
            "first": true,
            "cursor": true,
            "skip": true,
            "totalCount": true,
            "orderBy": true,
            "fields": [
                {
                    "name": "OrderID",
                    "type": "Double"
                },
                {
                    "name": "CustomerID",
                    "type": "String"
                },
                {
                    "name": "EmployeeID",
                    "type": "Double"
                },
                more fields...
                {
                    "name": "cursor",
                    "expression": "OrderID",
                    "type": "String"
                }
            ],
            "children": [
                {
                    "name": "OrderDetails",
                    "parent": "OrderID",
                    "child": "OrderID"
                }
            ],
            "join": [
                {
                    "name": "Customers",
                    "parent": "CustomerID",
                    "child": "CustomerID"
                },
                {
                    "name": "Employees",
                    "parent": "EmployeeID",
                    "child": "EmployeeID"
                }
            ]
        },
        {
            "name": "Products",
            "actualname": "Products",
            "query": true,
            "insert": true,
            "update": true,
            "delete": true,
            "first": true,
            "cursor": true,
            "skip": true,
            "totalCount": true,
            "orderBy": true,
            "fields": [
                {
                    "name": "ProductID",
                    "type": "Double"
                },
                {
                    "name": "ProductName",
                    "type": "String"
                },
                more fields...
                {
                    "name": "cursor",
                    "expression": "ProductID",
                    "type": "Boolean"
                }
            ],
            "children": [
                {
                    "name": "OrderDetails",
                    "parent": "ProductID",
                    "child": "ProductID"
                }
            ],
            "join": [
                {
                    "name": "Suppliers",
                    "parent": "SupplierID",
                    "child": "SupplierID"
                }
            ]
        }
more tables...
    ]
}
Testing Your GraphQL API
Right click on the service in the Web Control Panel and select the Test API with GraphIQL. GraphIQL is a graphical GraphQL query tester.
You can either perform the testing using Working Preview mode (Development Server does not need to be running) or Live mode (Development server must be running and service will be published to the Live Preview folder).

If you select the Working Preview mode, a dialog will open shown the GraphIQL tester.
If you select Live mode, the browser will open, showing the GraphIQL tester page and your GraphQL API definition will be loaded.
The Document Explorer panel will be shown on the right where you can explore the Queries and Mutations defined in your GraphQL Service.
NOTE If you do not see the Document Explorer
panel, click the Docs button in the toolbar.


Enter a GraphQL query and then click the Run button to execute your query.
GraphQL syntax is described in many articles you can read on-line.
Assuming you have build a service that exposes the Customers, Orders, Order Details and Products table from the sample Northwind database, here are some example queries and the corresponding data return by the query.
Query 1 - A simple query that only returns fields from the Customer table. The query uses the GetCustomer query and it specifies the Id (CustomerID: BONAP) of the customer to fetch.
			{
  GetCustomer(CustomerID: BONAP) {
    CustomerID
    ContactName
    City
    Country
  }
}
Result of Query 1
{
  "data": {
    "GetCustomer": {
      "CustomerID": "BONAP",
      "ContactName": "Laurence Lebihan",
      "City": "Marseille",
      "Country": "France"
    }
  }
}
Query 2 - Builds on Query 1, but includes data from the child Orders table. The OrderID and OrderData fields from the Orders table are retrieved
{
  GetCustomer(CustomerID: BONAP) {
    CustomerID
    ContactName
    City
    Country
    Orders{
      OrderID
      OrderDate
    }
  }
}
Result of Query 2
{
  "data": {
    "GetCustomer": {
      "CustomerID": "BONAP",
      "ContactName": "Laurence Lebihan",
      "City": "Marseille",
      "Country": "France",
      "Orders": [
        {
          "OrderID": 10331,
          "OrderDate": "1994-11-16 00:00:00"
        },
        {
          "OrderID": 10340,
          "OrderDate": "1994-11-29 00:00:00"
        },
        {
          "OrderID": 10362,
          "OrderDate": "1994-12-26 00:00:00"
        },
        {
          "OrderID": 10470,
          "OrderDate": "1995-04-11 00:00:00"
        },
        .......truncated
Query 3 - Builds on Query 2, but includes data from the Order Details table (which is aliased as OrderDetails). OrderDetails is a child table of the Orders table.
{
  GetCustomer(CustomerID: BONAP) {
    CustomerID
    ContactName
    City
    Country
    Orders{
      OrderID
      OrderDate
      OrderDetails{
        ProductID
        Quantity
        UnitPrice
        Products_ProductName
      }
    }
  }
}
Result of Query 3
			{
  "data": {
    "GetCustomer": {
      "CustomerID": "BONAP",
      "ContactName": "Laurence Lebihan",
      "City": "Marseille",
      "Country": "France",
      "Orders": [
        {
          "OrderID": 10331,
          "OrderDate": "1994-11-16 00:00:00",
          "OrderDetails": [
            {
              "ProductID": 54,
              "Quantity": 15,
              "UnitPrice": 5.9,
              "Products_ProductName": "Tourtière"
            }
          ]
        },
        {
          "OrderID": 10340,
          "OrderDate": "1994-11-29 00:00:00",
          "OrderDetails": [
            {
              "ProductID": 18,
              "Quantity": 20,
              "UnitPrice": 50,
              "Products_ProductName": "Carnarvon Tigers"
            },
            {
              "ProductID": 41,
              "Quantity": 12,
              "UnitPrice": 7.7,
              "Products_ProductName": "Jack's New England Clam Chowder"
            },
            {
              "ProductID": 43,
              "Quantity": 40,
              "UnitPrice": 36.8,
              "Products_ProductName": "Ipoh Coffee"
            }
          ]
        },
Using Variables in a Query
You can use variables, rather than hard coded literal values in your CraphQL queries. For example in the above samples, the CustomerID parameter is hard coded as BONAP.
To use a variable, define your variables in QUERY VARIABLES section in the GraphIQL builder.

Query Variables are defined using a JSON syntax. For example:
{
"customerId": "BOLID",
"city": "London"
}
To consume a query variable in the query definition, use the variable name with a $ prefix. For example:
{
  GetCustomer(CustomerID: $customerId) {
    CustomerID
    ContactName
    City
    Country
  }
}
Using Aliases
You can define an alias for any of the property names in the query result. For example in the sample Query 3 above, the Product Name is called Products_ProductName in the query result. You might want to change this to (say) ProductName. To do this you specify an alias in the query definition. To specify an alias for a property name, prefix the property name with aliasName: . For example:
{
  GetCustomer(CustomerID: BONAP) {
    CustomerID
    ContactName
    City
    Country
    Orders{
      OrderID
      OrderDate
      OrderDetails{
        ProductID
        Quantity
        UnitPrice
        ProductName:Products_ProductName
      }
    }
  }
}
Getting Multiple Records
In the previous examples we have executed queries that returned a single record. The Alpha Anywhere genie also generates queries to return multiple records. For example, the genie generates these queries for the Customer table: GetCustomer and GetManyCustomers.
When executing a GetMany* query (e.g. GetManyCustomers, GetManyOrders, etc.), you can optionally specify that you want to return a "page" of records (by specifying a "page size" parameter -- called first. You can also specify a cursor property to indicate at which record you want to start, and a skip property which indicates how many records you want to skip - after the record with the specified cursor) . For example, to return the first page of records where the Country field is "USA" and the page size is 3 records, you would define this query shown below:
Notice that the fields to be returned by the query are specified in an object called records. Your query definition can also include a property called pageInfo, which returns information about the pages in the query result, specifically if there are more pages of data
{
  GetManyCustomers( country: usa, first: 3, skip: 0  ){
    records{
      CustomerID
      City
      ContactName
      Cursor
    }
    pageInfo{
      hasNextPage

    }
  }
}
Here is the result of this query:
{
  "data": {
    "GetManyCustomers": {
      "records": [
        {
          "CustomerID": "GREAL",
          "City": "Eugene",
          "ContactName": "Howard Snyder",
          "cursor": "eyJjdXJzb3IiOiJHUkVBTCJ9"
        },
        {
          "CustomerID": "HUNGC",
          "City": "Elgin",
          "ContactName": "Yoshi Latimer",
          "cursor": "eyJjdXJzb3IiOiJIVU5HQyJ9"
        },
        {
          "CustomerID": "LAZYK",
          "City": "Walla Walla",
          "ContactName": "John Steel",
          "cursor": "eyJjdXJzb3IiOiJMQVpZSyJ9"
        }
      ],
      "pageInfo": {
        "hasNextPage": true
      }
    }
  }
}
Notice that in the query result pageInfo.hasNextPage property we can see that there are more pages of data. To get the second page of data we include the cursor property in the query parameters and we set the skip property to 1. (If we did not set the skip property to 1 then the last record in the previous query would become the first record in this query).
Here is the query to get the second page of records:
{
  GetManyCustomers( country: usa, first: 3, skip: 1 cursor: "eyJjdXJzb3IiOiJMQVpZSyJ9" ){
    records{
      CustomerID
      City
      ContactName
      Cursor
    }
    pageInfo{
      hasNextPage

    }
  }
}
Calling a Mutation
By default the GraphQL genie will automatically create mutations to update, insert, and delete records in each of the tables in your API definition.
In the next example, we show how to do an update on the Customers table.
mutation {
  UpdateCustomer(
where: {CustomerID: bolid},
set: {City: Madrid}
) {
    CustomerID
    CompanyName
    ContactName
    ContactTitle
    City
    Country
  }
}
The syntax for the mutation includes a where clause with values for certain fields (in the above example, the record for CustomerID = BOLID will be updated) and a set clause that contains a comma delimited list of fields and corresponding values. You can use arguments in both the where clause and the set clause. You can also optionally specify fields to be returned after he update is completed. In the above example, after the update is performed, the query returns data for the CustomerID, CompanyName, ContactTitle, City and Country fields.
In addition to the automatically created mutations (such as the UpdateCustomer mutation shown above), you can also create custom mutations (using either Xbasic or NodeJS). This is discussed below.
This mutation will update multiple records (because the Set clause specified city = London and there are multiple matching records):
mutation {
  UpdateCustomer(where: {city: london}, set: {ContactTitle: Apprentice}) {
    CustomerID
    CompanyName
    ContactName
    ContactTitle
    City
    Country
  }
}
Here is a mutation to insert a new record:
mutation {
  AddCustomer(CustomerID: ABCD, ContactName: Jim Smith, CompanyName: Alpha Software) {
    CustomerID
    CompanyName
  }
}
Notice that the inserted record has set three field values and after the insert is completed, the query returns the value in the CustomerID field and the CompanyName field.
In this case, the table primary key (CustomerID) is not an auto-increment field (and it is explicitly set when the new record is added). But in many cases the primary key will be an auto-increment field and you will want to know what the primary key of the inserted record is. By specifying the primary key field in the list of fields returned by the query, you can get the value of the primary key.
Required Fields
When you define a GraphQL API to perform CRUD operations on a SQL table, you can mark certain fields in your definition as required fields (i.e. non nullable). For example in the sample definition show earlier, we indicated that the Categories table exposed certain fields. If we want to indicate that the CategoryName field is a required field (so that when you use the AddCategories mutation you will be required to specify a value for this field, change the definition for the CategoryName field to use an ! character after the type name. For example:
{
"name": "CategoryName",
"type": "String!"
}
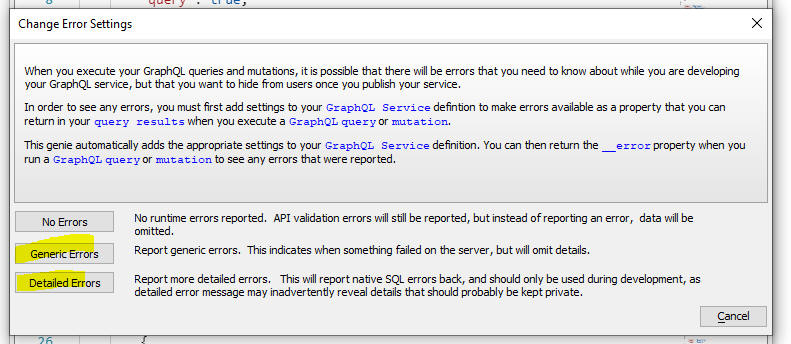
Reporting Errors
When you execute a mutation, by default errors are not reported unless you add a directive to your GraphQL definition.
For example, say we want the mutations that operate on the Categories table to report errors. You would need to add a new property to the definition. You can add the "nativeErrors" or "errors" property to the definition (set the property value to true or false). The nativeErrors property will report errors returned by the SQL database. The errors property will return error reported to Xbasic.
For example:
"totalCount": true,
"orderBy": true,
"nativeErrors": true,
....
To see the errors in the query result add the __error column to the query result specification.
You can easily set or unset the error properties for all tables in your GraphQL service definition by clicking on the Runtime Error Settings hyperlink the the builder.

This will open a builder when you can select the error setting.
How to Create Custom Mutations
Alpha Anywhere automatically adds mutations to perform update, insert and delete operations for all of the tables you select when you define the service (unless you set the corresponding query, update, insert or delete property to false in the service definition). You may also want your GraphQL service to define custom mutations -- that you write using either Xbasic or Node.
To add custom mutations to your GraphQL API create a new Xbasic class or Node API. Your Xbasic class definition or Node API will include one or more methods. Your GraphQL API will expose all of the methods defined in the Xbasic class or Node API.
In the walkthrough that follows we will define a custom mutation (called parseNameXB based on a method in an Xbasic class) that will take a string of the form:
firstname lastname,streetNumber streetName,city state zip
and will return and object with these properties:
firstname
lastname
address
streetNumber
streetName
citystatezip
city
state
zip
We will then show a second custom mutation (called parseNameNode) that does the same thing, but this time based on a method defined in a Node API.
Here is a summary of the steps we will go through
Step 1 - Create an Xbasic class with a method called parseNameXB.
Step 2 - Test the method in the Interactive Window
Step 3 - Create a new GraphQL service and define a Custom Mutation using the Xbasic class you created.
Step 4 - Test the custom Mutation in the GraphIQL tester
Step 1 - Create an Xbasic class
At the Web Projects Control panel, select the Xbasic category. Click the New button and create a new Xbasic Class. Enter the following code in the editor:
define class customMutations::class1
	function parseNamexb as customMutations::name (fullnameandaddress as c)
		dim text as c = fullnameandaddress
		dim line1 as c
		dim line2 as c
		dim line3 as c
		text = comma_to_crlf(text)
		line1 = alltrim(word(text,1, crlf()))
		line2 = alltrim(word(text,2, crlf()))
		line3 = alltrim(word(text,3, crlf()))
		if w_count(line1," ") = 2 then
			dim fname as c  = word(line1,1," ")
			dim lname as c = word(line1,2," ")
		else 'account for possible middle initial
			dim fname as c  = word(line1,1," ")
			dim lname as c = word(line1,-1," ")
		end if
		dim streetNumber as c  = word(line2,1," ")
		dim street as c
		street = alltrim(stritran(line2,streetNumber,"")) 'remove streetnumber from line2
		dim zip as c = word(line3,-1," ")
		dim state as c = word(line3,-2," ",1)
		dim city as c = alltrim(stritran(line3,zip,"")) 'remove zip from line3
		city = alltrim(stritran(city,state,"")) 'remove state from city

		dim address as customMutations::address
		dim citystatezip as customMutations::citystatezip
		address.streetNumber = streetNumber
		address.street = street

		citystatezip.zip = zip
		citystatezip.city = city
		citystatezip.state = state

		address.citystatezip = citystatezip
		parseNamexb.firstname = fname
		parseNamexb.lastname = lname
		parseNamexb.address = address
	end function
end class

define class customMutations::name
	dim firstname as c
	dim lastname as c
	dim address as customMutations::address
end class

define class customMutations::citystatezip
	dim zip as c
	dim state as c
	dim city as c
end class

define class customMutations::address
	dim street as c
	dim streetNumber as c
	DIM citystatezip as customMutations::citystatezip
end class
Here are some key points about the code in the method definition:
- We define four classes in the file, one of which contains the definitions of the methods we want to expose. The other three classes (customMutations::name, customMutations::citystatezip and customMutations::address) define complex types used in defining the return value of the method.
- Notice that the parseNameXB method returns a value of type customMutations::name. (It is more common to see custom Xbasic code return a value of type P, but by setting the return value to an explicit type we can be more specific about what values the method returns).
- The customMutations::name class is defined in the file. Notice that this class returns a class with 3 properties, one of which (address) is also a complex type.
- The address type is also defined in the file and one of the properties in this class is another complex type (citystatezip) which is also defined in this class.
- The method that does the work (parseNameXb)
works as follows:
- Split the input parameter into 3 lines.
- Extract fname and lname from line1 (taking into account that the input value might include a middle initial, in which case line1 will have 3 words)
- Extract the streetnumber and street from line2
- Extract the city, state and zip from line3
- DIM an instance of the address and citystatezip types.
- Assign property values to the properties of these two classes.
- Assign the return value of the method.
When you are done entering the Xbasic class definitions, click the Save button on the toolbar. Alpha Anywhere will suggest a default file name, which you can accept.
To test the code in the mutation from the Interactive window, go to the Interactive window and enter these lines (pressing enter after you enter each line)
dim x as customMutations::class1
p = x.parseNamexb("fred smith, 123 main street,boston ma")
?json_generate(p)
= {
	"firstname": "fred",
	"lastname": "smith",
	"address": {
		"street": "main street",
		"streetNumber": "123",
		"citystatezip": {
			"zip": "ma",
			"state": "boston",
			"city": ""
		}
	}
}
Next you will need to add the custom mutation to your GraphQL service definition. Edit the service definition and then click on the User-defined mutations hyperlink at the bottom of the window.

This will open a dialog where you can specify the classes that define the methods you want to expose in your custom mutations:

Click the Select class hyperlink.
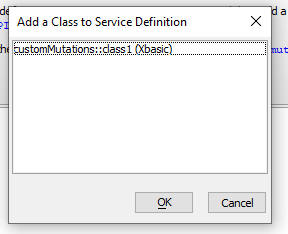
Click OK twice, then save the service definition.
To test the mutation in the GraphIQL tester, right click on the service name in the Web Control Panel and select the Test with GraphIQL command.
Enter this mutation:
mutation {
  parseNamexb(fullnameandaddress: "Fred Smith,123 Main St,Ithaca NY 12345") {
    firstname
    lastname
    address {
      street
      streetNumber
      citystatezip {
        city
        state
        zip
      }
    }
  }
}
When you run the query, you should see this result:
{
  "data": {
    "parseNamexb": {
      "firstname": "Fred",
      "lastname": "Smith",
      "address": {
        "street": "Main St",
        "streetNumber": "123",
        "citystatezip": {
          "city": "Ithaca",
          "state": "NY",
          "zip": "12345"
        }
      }
    }
  }
}
Security
By default, the GraphQL API that you create is not authenticated. You can add authentication to your API by clicking on the Authorization hyperlink in the GraphQL Service builder.

This will open a dialog where you can specify the name of the method to call to authorize the user. You can use either Xbasic or Node to write the authorization method.
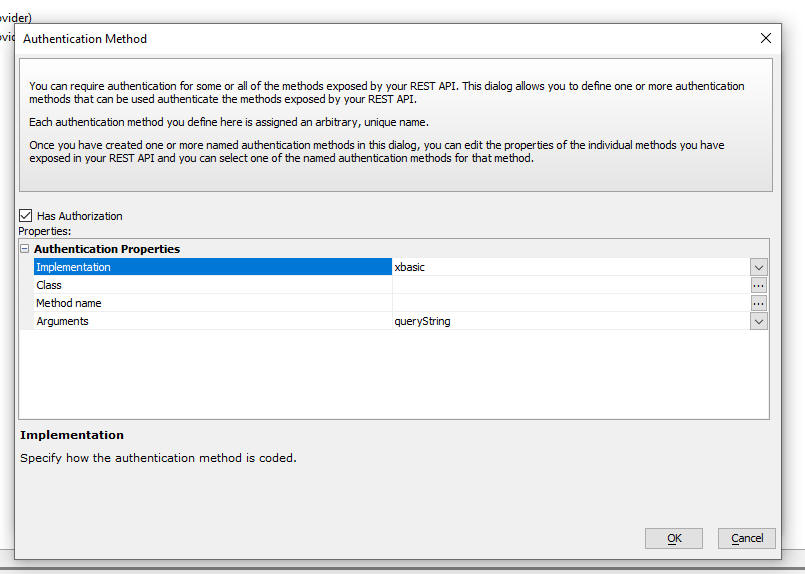
You can also specify if the arguments to the authentication method are supplied in the request header, or in the query string.
The authentication method should return an HTTP status code. For example if your method returns 200, the user is authorized. If your method returns 401, the user is denied permission to use the API.
For example, here is a Xbasic class that defines an authorize method that you can specify in the Authentication method dialog. This class must be defined in the Xbasic section of the Web Control Panel. The method authorizes the user if they specify a value of "alpha" for the apikey.
define class graphql::auth
function authorize as n (apikey as c )
if apikey = "alpha"
authorize =
200
else
authorize =
401
end if
end function
end class
Creating a Test Page For Your GraphQL API
You might want your published application to include a page where users can test your GraphQL API (in the same way that you can test it at development time by right clicking on the service name in the Web Control Panel, and then selecting the Test API with GraphiQL command.
To create a page for testing your GraphQL service open the GraphQL service definition and click the Create GraphQL API test page hyperlink.

Xbasic Helper Functions
The following Xbasic helper functions are available:
- a5wcb_graphQLQueryBuilder() - Allows you to use the GraphIQL Query Tester to define a GraphQL query
- a5_graphQL_Execute() - Allows you to execute a GraphQL query
a5wcb_graphQLQueryBuilder()
Syntax:
P result = a5wcb_graphQLQueryBuilder(C websiteBaseURL ,C servicename [,C authorizationType [,C queryString [,C variablesJSON [,C authorizationVariable [,L flagShowWarningOnExit ]]]]])
Where
- result - An object with these properties:
lastbutton (OK
or Cancel - indicated if user pressed the
Save or
Cancel button to
exit the builder),
query - the GraphQL query that the user defined.
vars - any Query
Variables that the user defined.
- websiteBaseURL - The base URL of the web site where the service has been deployed. If you are building a query for a locally defined service that has not been deployed, you can specify [workingPreview] (to indicate that the service is defined in the current web project) or [workingPreview:<projectName>] (to indicate that the service was defined in a different web project.
- servicename - name of the service (e.g. Northwind.a5svc - the extension is not required)
- authorizationType - Can be header or queryString. Indicates if the authorizationVariable will be in the request header or the request query string.
- queryString - If authorizationType is queryString, then specify the api key here.
- variablesJSON - query variables (using JSON format) for example: {"country":"usa", "customer": "Alpha Software"}
- authorizationVariable - name of the parameter (or header) that has the api key.
- flagShowWarningOnExit - defaults to .t. - indicates
if the dialog has Save
and Cancel
buttons.
For example, assume you have defined a GraphQL service (called Northwind.a5svc) that exposes data from tables in the sample Northwind database.
To build a query, go to the Interactive window and type (pressing Enter after each line):
Dim P as p
p = a5wcb_graphQLQueryBuilder("[workingpreview]","northwind")
The GraphIQL tester will open in a window. You can enter a query definition and test it. When you are done, click the Save button in the bottom right corner.
To see the query string that you defined, enter:
showvar(p.query)
To see any query variables that you defined, enter
showvar(p.vars)
a5_graphQL_Execute()
Executes a GraphQL query against a GraphQL service defined in Alpha
Anywhere.
Note: This function is not intended to execute against a 3rd party GraphQL service. To execute a query against a 3rd party GraphQL service use the Xbasic CURL object to make an HTTP POST request.
Syntax:
p result = a5_graphQL_Execute as P (C serviceName as c, C queryString [, C headers [,C variables [, C queryParameters]]])
Where
- result - is an object with these properties: error (.t. or .f.), errorText (error description), responseCode (200 if request was successful) and result (a string showing the query result - JSON format).
- serviceName - name of the GraphQL service. E.g. northwind.a5svc (the .a5svc extension is optional. If the service was defined in a different Web Project you can qualify the service name with the project name (e.g. [demoProject]\northwind.a5svc).
- queryString - The GraphQL query definition.
- headers - If the service requires authentication and if the api key is passed in the header, specify the headers.
- variables - If the queryString uses variables, the value for each variable (JSON format).
- queryParameters - If the service requires authentication and if the api key is passed in the query string, specify the query string.
Example:
Assume you have built a service called Northwind.a5svc in the current Web Project. Here is a script to execute a query against this service:
	dim servicename as c = "[demo]\northwind"
	dim queryString as c = <<%str%
	{
	  cust1: GetCustomer(CustomerID: $var1) {
	    CustomerID
	    ContactName
	    CompanyName
	    City
	    Country
	  }
	  cust2: GetCustomer(CustomerID: $var2) {
	    CustomerID
	    ContactName
	    CompanyName
	    City
	    Country
	    ContactTitle
	    Orders {
	      OrderID
	      OrderDate
	      OrderDetails {
	        ProductID
	        Quantity
	        UnitPrice
	        __typename
	      }
	    }
	  }

	}

	%str%

	dim variables as c = <<%str%
	{
	    "var1": "blaus",
	    "var2": "bolid"
	}
	%str%


	dim p as p
	t1 = now()
	p = a5_graphQL_Execute(servicename,queryString,"",variables)
	t2 = now()
	if p.error = .f. then
		DIM _result as c = p.result
		_result = convert_utf8_to_acp(_result)
		showvar(_result)
	else
		showvar(p.errortext)
	end if
Here is the result returned by this query:
			{
			    "data": {
			        "cust1": {
			            "CustomerID": "BLAUS",
			            "ContactName": "Hanna Moos",
			            "CompanyName": "Blauer See Delikatessen",
			            "City": "Mannheim",
			            "Country": "Germany"
			        },
			        "cust2": {
			            "CustomerID": "BOLID",
			            "ContactName": "Martín Sommer",
			            "CompanyName": "Bólido Comidas preparadas",
			            "City": "Madrid",
			            "Country": "Spain",
			            "ContactTitle": "Owner",
			            "Orders": [
			                {
			                    "OrderID": 10326,
			                    "OrderDate": "1996-10-10 00:00:00",
			                    "OrderDetails": [
			                        {
			                            "ProductID": 4,
			                            "Quantity": 24,
			                            "UnitPrice": 17.6,
			                            "__typename": "OrderDetail"
			                        },
			                        {
			                            "ProductID": 57,
			                            "Quantity": 16,
			                            "UnitPrice": 15.6,
			                            "__typename": "OrderDetail"
			                        },
			                        {
			                            "ProductID": 75,
			                            "Quantity": 50,
			                            "UnitPrice": 6.2,
			                            "__typename": "OrderDetail"
			                        }
			                    ]
			                },
			                {
			                    "OrderID": 10801,
			                    "OrderDate": "1997-12-29 00:00:00",
			                    "OrderDetails": [
			                        {
			                            "ProductID": 17,
			                            "Quantity": 40,
			                            "UnitPrice": 39,
			                            "__typename": "OrderDetail"
			                        },
			                        {
			                            "ProductID": 29,
			                            "Quantity": 20,
			                            "UnitPrice": 123.79,
			                            "__typename": "OrderDetail"
			                        }
			                    ]
			                },
			                {
			                    "OrderID": 10970,
			                    "OrderDate": "1998-03-24 00:00:00",
			                    "OrderDetails": [
			                        {
			                            "ProductID": 52,
			                            "Quantity": 40,
			                            "UnitPrice": 7,
			                            "__typename": "OrderDetail"
			                        }
			                    ]
			                }
			            ]
			        }
			    }
			}
Javascript Helper Functions
The a5_graphQL_Execute() function is an Xbasic function. This means that is must be used in server-side code. However, you can also execute queries against GraphQL services directly from the browser (bypassing the Alpha Anywhere server completely) using a function defined in the Alpha Anywhere Javascript library.
The {dialog.object}.graphQLQuery() method executes a GraphQL query.
The {dialog.object}.graphQLQueryPromise() method is a variant of the {dialog.object}.graphQLQuery() method, but instead of taking a callback function as an argument, it returns a promise.
Syntax:
{dialog.object}.graphQLQuery(url,querySefinition,variables,headers,queryParameters,onSuccess,onFail)
var promise = {dialog.object}.graphQLQueryPromise(url,querySefinition,variables,headers,queryParameters)
Where
- url - The URL of the service (e.g. http://www.mygraphqlservice.com/northwind.a5svc)
- queryDefinition - the string that defines the query
- variables - a n object that defines values for each of the query variables (e.g. {"customerId": "BOLID"} )
- headers - an array of objects. Each object in the array has a name and value property. Used when the service requires authentication via an api key that must be passed in the header of the request.
- queryParameters - a string of name=value pairs. Used when the service requires authentication via an api key that must be passed as a query parameter.
- onSuccess - the callback function to call once the data is returned.
- onFail - the callback function to call if there is an error.
Here is an example of a Javascript function that you might have on a button in a UX component to populate a List control with the results from a GraphQL query:
			var url = 'http://www.mygraphqlservice.com/northwind.a5svc';
			var query = `
			  {
				  GetManyCustomers {
				    records {
				      CustomerID
				      ContactName
				      CompanyName
				      City
				      Country
				    }
				  }
				}
			`

			{dialog.object}.graphQLQueryPromise(url,query,'','')
			.then(data => {
				var j = JSON.parse(data);
				var lObj = {dialog.object}.getControl('list1')
				lObj.populate(j.data.GetManyCustomers.records)
			})